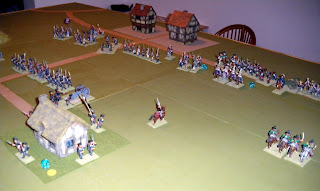
3rd Prussian corps ready to attack Helmstedt
4th Prussian corps still deploying to the left of road
XIII French corps have three brigades in square due to Prussian cavalry
VI French corps has started to arrive along the road top left
General Blucher (Average) – 4CP
Move to Taentzien
Change 4th corps orders to Engage
 4th Prussian corps
Move guns forward and unlimber
Move rear infantry brigades forward
 VI French corps
Move corps towards Helmstedt
Change orders to Halt
Move Marmont to centre of corps
Marshal Davout (Gifted) – 7CP
Moves to join Marmont
Change VI corps orders to Move to farm
Move to right of XIII corps
 3rd Prussian corps
General Bulow (Average) – 6CP – Engage
Artillery fire on square (3) and miss
Manhandle artillery forward
Move three infantry column towards Helmstedt
Move Bulow to command range of cavalry brigade
Move hussar brigade within Opportunity Charge range of VI corps column
Test morale for Shaken garrison (2), fail and remain Shaken
 XIII French corps
 General Poniatowski (Poor) – 6CP – Hold Helmstedt
Artillery fire on column (5) and miss
Bounce through on artillery beside column (6) and miss
Lancer brigade charge Prussian hussars
Hussars test morale to counter charge (4) and pass
Melee combat total 6, both brigades Disordered
Move Poniatowski to right flank
Manhandle artillery back towards Helmstedt
Retire right flank square back towards Helmstedt
Notes on Game
The infantry holding the farm is the best brigade in 3rd corps, yet out of three morale tests they have rolled one twice and two once. Just as well they are A class infantry or they would have routed by now.
VI French corps ended their move in column of march along the Wolfsburg-Helmstedt road. 3rd Prussian hussar brigade were out of charge range, but they advanced so that they could declare an Opportunity Charge during VI corps turn. The corps was saved by 13th lancers charging the hussars, even though they carried a casualty from a previous battle. The melee result was both sides Disordered, so the hussars will not be able to charge the column next turn.
The whole of 4th Prussian corps is in position to attack the right of XIII French corps, but unless they have very good dice for their CP it is likely that night fall will rob them of the opportunity.
A normal battle/wargame lasts 12 moves, but in the past we have allowed an extra move if both sides are in combat but neither have broken. If the Prussians can press home their attack this extra move would be allowed to avoid a second day of battle.

Paul,
ReplyDeleteMy Lancers won the turn 18 skirmish against the Prussian Hussars, without taking a casualty and I was at full strength for that.
Did the lancers take a casualty for some other reason that may have accidentally been left out of reports 19 and 20?
Otherwise, my reports show that my lancers should be at full strength still.
Not complaining, just curious...they fought well regardless.
Hi Justin
ReplyDeleteWell spotted
You are right that 13 lancer brigade did not receive any casualties prior to the battle.
The order of battle sheet which we use for wargames show 13 lancer brigade with one casualty. This must be an error.
Fortunately it has not made any difference, and the lancers defeated the Prussian hussars, despite their casualty.
Looking back at the photographs I notice that the casualty was shown right from the start. Its shame you did not mention it sooner.
regards
Paul
Yeah, I didn't know what the blue die meant, but started to consider its purpose over the past three turns after artillery casualties occurred. The Lancers HAD taken casualties the turn I took command of the corps, which were since recovered, so that may be the origins of the error. No harm done and they saved VI Corps from a serious problem.:)
ReplyDeleteHi Justin
ReplyDeleteI suspect that the lancer casualties had been returned on the umpire report, but not on the casualty sheet. I usually check each before the wargame, but obviously missed it this time.
Fortunately your lancers won their melee, even with the handicap. They routed the Prussian hussars, and they could not do better than that.
regards
Paul